And have you already discovered our Facebook page Humans of the Nordic Region?

Saturday, April 29, 2017
How to create an Intense & Dramatic Portrait Effect Photoshop
How to create an Intense & Dramatic Portrait Effect Photoshop

Sunday, April 23, 2017
How to match background and foreground color in Photoshop
How to match background and foreground color in Photoshop
And have you already discovered our Facebook page Humans of the Nordic Region?
Thursday, April 20, 2017
Create a sunset effect in Photoshop using a Solid Color
Create a sunset effect in Photoshop using a Solid Color
And have you already discovered our Facebook page Humans of the Nordic Region?
Wednesday, April 19, 2017
How to warm up your image in Photoshop
How to warm up your image in Photoshop
And have you already discovered our Facebook page Humans of the Nordic Region?
Monday, April 17, 2017
How to Color hair in Photoshop using a Solid color
How to Color hair in Photoshop using a Solid color
And have you already discovered our Facebook page Humans of the Nordic Region?
Thursday, April 13, 2017
How to create a Pencil Sketch effect in Photoshop
How to create a Pencil Sketch effect in Photoshop
Easy quick and simple !
And have you already discovered our Facebook page Humans of the Nordic Region?
picture from pixabay
Tuesday, April 11, 2017
Improve your Photoshop skills
Watching Youtube movies is still one of the best thing to improve Photoshop skills. But the best way is to do it yourself.
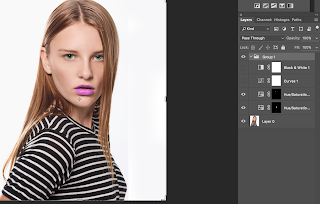
I started with this picture


And have you already discovered our Facebook page Humans of the Nordic Region?
I started with this picture

I wanted to change the colors of her lips and the colors of her eyes. And i wanted to have the possibility to change the colors anytime during the project.
First i changed the colors of her lips using a Hue and Saturation Adjustment layer. I changed the colors and made the mask black. I painted with white over her lips to make them purple.

Then I added a second Hue and saturation Adjustment Layer to change the colors of her eyes.

At least I added a Curve and a Black and White Adjustment Layer. (For more contrast)

Oher things you can do is to change the background color but this time I didn't do that. I made a stamp visible Layer and move the first and last layer to a new document. With those two layers I made an Animated Gif to see the Before and After.

If you want be better with Photoshop the only thing to do is practise, practise and practise. Youtube has tons of movies to help you. Have fun.
And have you already discovered our Facebook page Humans of the Nordic Region?
picture from Pixabay.com
Lightroom Quicktip, save your editing as a preset
In Lightroom you can easily save your editing as a preset. For example you can do some split toning and save it as a preset and use it for another picture.
Open the image in Lightroom


Open the image in Lightroom

Do the editing

Now click on the + on the left site in the preset panel.

Choose with changes you want to save and give the preset a name.
Easy and simple!
Monday, April 10, 2017
Makes eyes equal in Photoshop (part2)
Another way to make the eyes of a person more equal is using the liquify filter in Photoshop.
Open your image


Open your image

Duplicate the background layer (Ctrl or Cmd J). Now go to Filter > Liquify.
Make the eyes bigger with the right panel.

Now both her eyes are bigger. So add a layer mask and paint with black over the right eye to see the original eye again.
Here is the end result

And have you already discovered our Facebook page Humans of the Nordic Region?
Make eyes equal in Photoshop (Part1)
Open and image

Her right eye is smaller. In Photoshop we can easily fix this!
Select her left eye with the lasso tool

Feather the selection with 10 px

Hit Ctrl or Cmd J to get it anohter layer
Now hit Ctrl or Cmd T to open the Free Transform Ctrl Click in the middel and Flipt it horizontal
Move the eye over the right eye (lower the opacity to see if it fits)
Add a layer mask anad remove part you dont want with a black brush

Now the eyes are eagel
Now you just have to clonestamp the softbox from her right eye to the left eye and
now the eyes are eaqal

And have you already discovered our Facebook page Humans of the Nordic Region?
How to create a beautiful sunset effect in Photoshop
How to create a beautiful sunset effect in Photoshop
And have you already discovered our Facebook page Humans of the Nordic Region?
Friday, April 7, 2017
How to jump high in the sky in Phototoshop
How to make someone jumping really high in the sky?. Just follow this steps.

Duplicate the background and make a selection of the girl (with for example the quick selection tool). Use select and maks to refine the selection. Choose 'New layer with layer Mask' for the output

Deselect the top layer and unlock the background layer.

Remove the girl form the background layer. There are lots of way to do it. Use the clone stamp, select the girl and use content aware fill or the spot healing brush. Take your time and see how you can get the best result.

Now we should get more space in the upper part of the image. Use the Clone stamp to make more space.

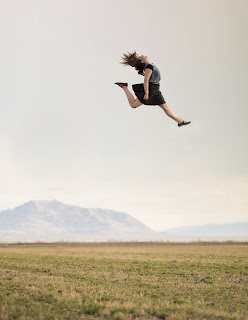

Fill it with more sky. To do this can use Edit > Content aware scale or select the top part of the sky with the Rectangular Marquee Tool and extend it using Free transform.
Make the top layer active again and select the girl (not the mask). With the move tool (v) you can move the girl higher in the frame.
And now the girl is high in the sky.

And have you already discovered our Facebook page Humans of the Nordic Region?
Thursday, April 6, 2017
How to change your background color in Photoshop
To change your background color in Photoshop is very easy.

First cut out your subject from the background

Then add a new layer underneath it and fill it with a color. Then add a Hue and Saturation Adjustment layer.


First cut out your subject from the background

Then add a new layer underneath it and fill it with a color. Then add a Hue and Saturation Adjustment layer.

Double click on the Hue and saturation to open it

By moving the hue slider you can find a color that fits best with your subject or the way you like to see your image.

Easy quick and simple !
How to make clouds in Photoshop
Watch this movie to see how to make clouds in Photoshop.
And have you already discovered our Facebook page Humans of the Nordic Region?
Monday, April 3, 2017
Photoshop for Beginners | How to use Color Range
Photoshop for Beginners | How to use Color Range
Subscribe to:
Posts (Atom)