Friday, September 30, 2016

Fascinating! How to create an Optical Face illusion In Photoshop

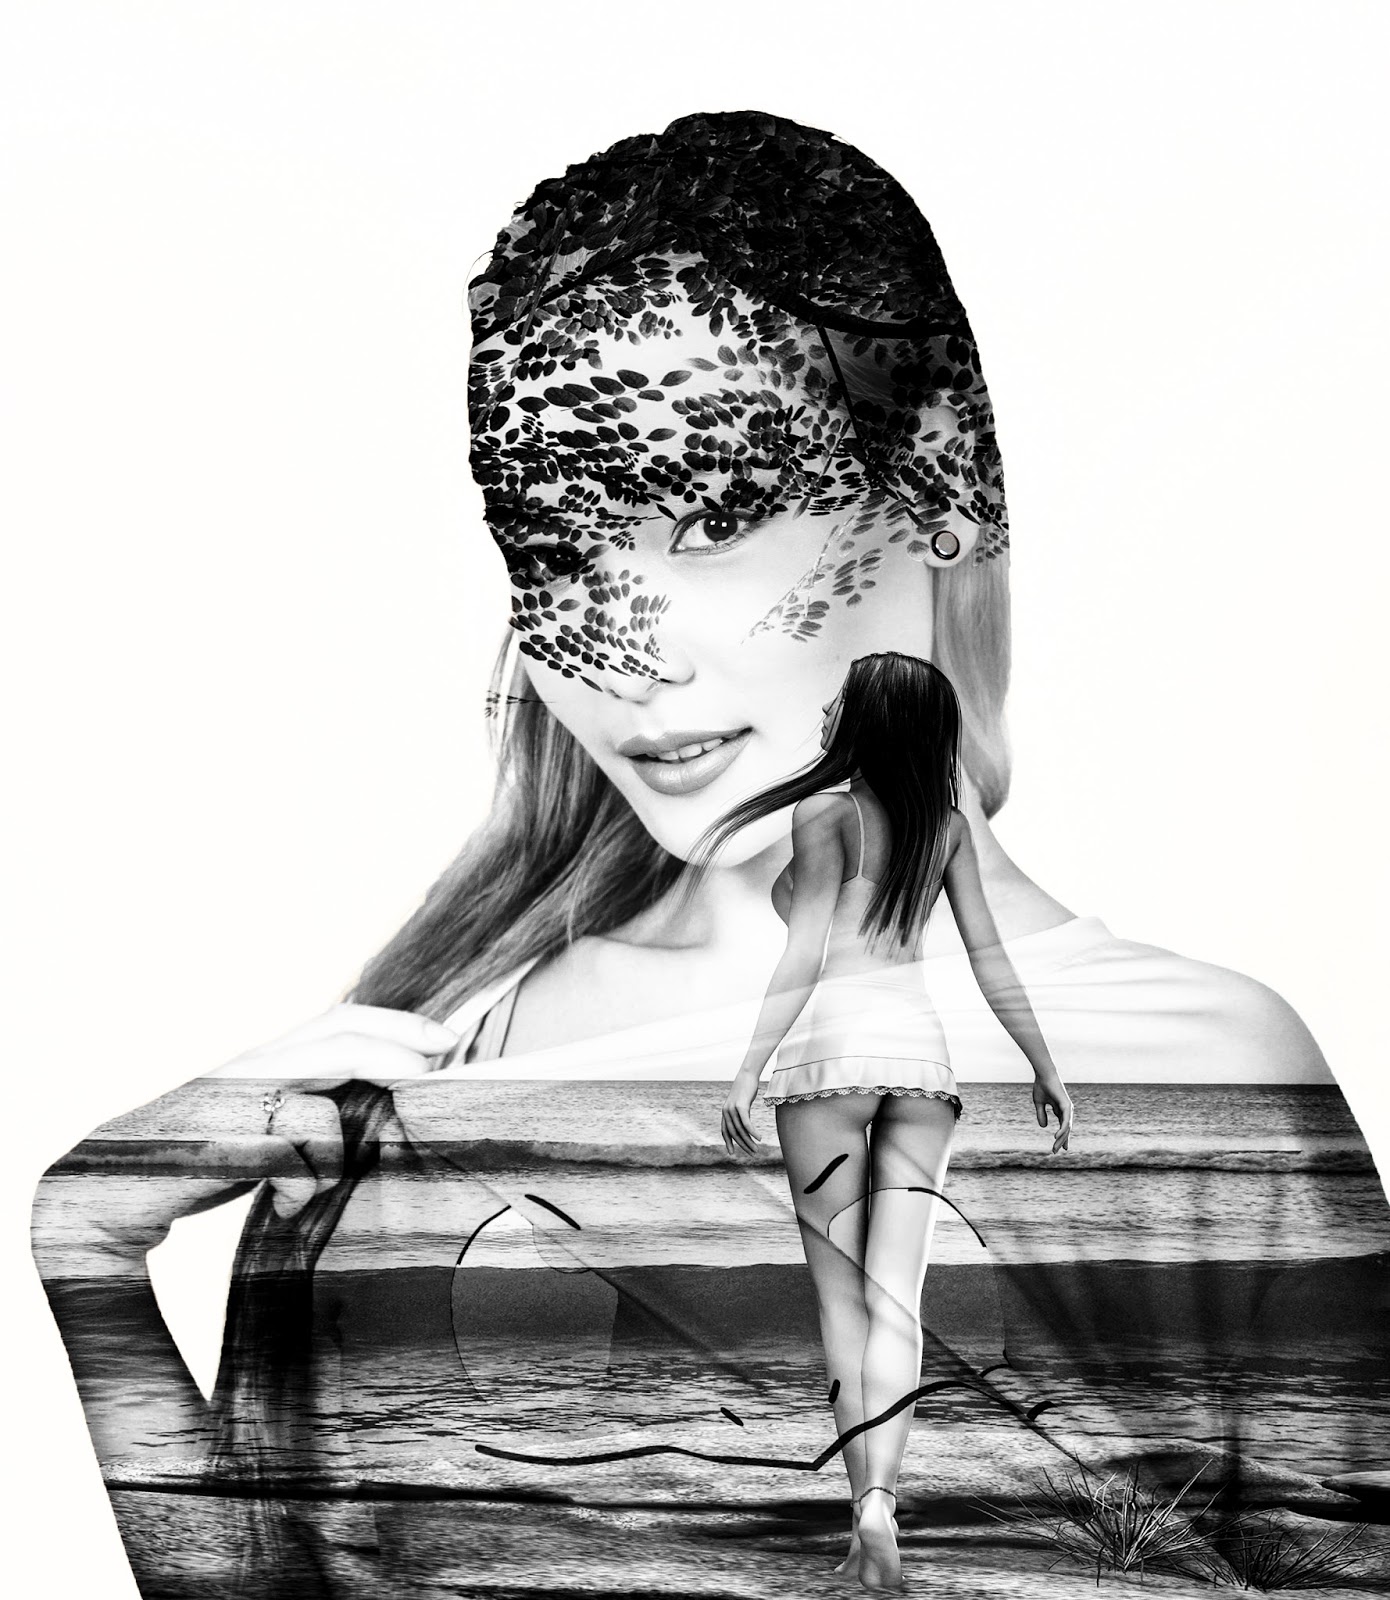
THis pist is about making an optical face illusion like this one: 

With these two photos:


I started with flipping both photos horizontal, but that is not necessary.

Crop the second photo like this:

Make a selection of the face. Easiest way to do this is with the Magic Wand Tool (W) and Inverse your selection  (Select > Inverse)

Now hit Cmd J or Ctrl J on Window to get the selection on his own layer.

Drag the first Photo over this one with the Move Tool (V).
Cmd click on the selection of the Face and then click on Mask icon. (Ctrl Click on Windows).

Now you've get these 3 layers:

The face of the first photo now has a layer. Unlink the mask and use Cmd T or Ctrl T on Windows to make the face bigger so that it fits. Make sure to select the face and not the mask if you do this!

Alignment of the lips and nose is very important to make it look natural.

Now you can tweak it to exactly the image you want to have.

Don't forget to follow us on Facebook or 500px


And have you already discovered our Facebook page Humans of the Nordic Region?


Wednesday, September 28, 2016

How to clean up your background

Sometimes you've got a great picture but the background is busy and takes away the focus from your subject. 

In that case you can use this tool in Photoshop to remove the unwanted 'objects' in the background.

I started with this picture:
 (from pixabay.com)

It's a nice picture of a running lady, but there is so much happening so much in the background that the focus in this image is not on the subject. In sports it's so much better (in most cases) to have a clean background.

So to remove the unwanted 'objects' in the background I used two tools:
  1. Spot Healing Brush Tool (J): Paint over an area and Photoshop will try to repair this section.
  2. Clone Stamp tool: Clone a piece and paint over the area you want to replace.
But you can also use:
  1. Healing brush tool: Same as the Spot Healing Brush Tool, but you have to select a reference point.
  2. Patch tool: Select an area and drag the selection over an area you want to generate a fill from.
  3. Content aware fill: Select an area with your Lasso Tool and use Content Aware fill.
Here you can find all the details of the retouch and repair functionality in Photoshop.

I began with the person all the way on the right. I added a new (empty layer) and painted over it with the Spot Healing brush tool. It did a pretty good job, but to complete it, I used the Clone stamp to make the edges smoother.

Then I removed the people in the background the same way. I did it one more time with the people just behind the running lady. And there you have it, the intermediate result.

Next step is to remove the shadows behind the lady. Whilst I was at it, I also removed the building on the left side. And all with the Spot Healing Brush and the Clone Stamp Tool.

And this is my final result. A much cleaner image with full focus on the smiley running lady: 

Don't forget to follow us on Facebook or 500px.

And have you already discovered our Facebook page Humans of the Nordic Region?


Sunday, September 25, 2016

Here's an easy way to replace a sky in Photoshop

Sometimes you just want the sky in your image to be a bit more... well I guess exciting is the word I'm looking for. Even though a nice blue sky is a nice blue sky, in a picture it usually works better with a bit more going on in the sky. And let me tell you: replacing a sky is very easy in Photoshop. 

1. Select the sky you want to replace
2. Invert the selection (Select > Inverse
3. Put the selection on his own Layer Ctrl or Cmd J
4. Drag the new sky over the image and make it fit using Ctrl or Cmd T
5. Drag the new sky under the layer of step 3

In this case I added some reflections of the clouds into the sky. I made the top of the sky a little darker and lightened up the photo with a Levels adjustment layer. 

And voila: this is the end result: I think replacing the sky made the picture a whole lot more interesting. 

Don't forget to follow us on Facebook or 500px.


And have you already discovered our Facebook page Humans of the Nordic Region?


pictures from pixabay.com

Thursday, September 22, 2016

How to select and mask in Photoshop

The 'new'  select and mask in Photoshop works pretty well. I saw two clips which I think did a great job explaining the new select and mask possibilities in Photoshop (the old refine edge functionality): 


These two videos are very instructive. I had a go at it myself and let me tell you: it really works very well! 

I began with this 2 pictures:


Then you move the picture with the girl onto the streets of New York.

Select the girl with the quick selection tool (W) and drag the transparency slider to the right. 

So there you have it: in a couple of minutes you can change the background of the image. It's that simple!

Watch the videos and try it yourself!

Don't forget to follow us on Facebook or 500px


And have you already discovered our Facebook page Humans of the Nordic Region?

Monday, September 19, 2016

How to use the clarity slider in Lightroom with portraits

This is a short blog about the infamous clarity slider in Lightroom. It's a good thing to know how to use the clarity slider (or Camera Raw in Photoshop) with portraits.

There's just one golden rule, namely: women need less clarity then men. Don't ask me why, just take my word for it. 

So when editing portrait pictures of men increase the clarity and for women do exactly the opposite: decrease the clarity.  

Let me show you two examples:


I guess for a woman, we're very much used to a soft skin. Whereas for men it's accepted to see more details of his skin. 

Then again, in some cases you can ofcourse also decrease the clarity in a portrait of a man. Just to create another atmosphere. But let me tell you that if you do it the other way around: increase the clarity in a woman's portrait, the subject of your portrait might not be too pleased. Have a go and try it out on different portraits. 

Don't forget to follow us on Facebook or 500px.

And have you already discovered our Facebook page Humans of the Nordic Region?


Pictures from pixabay.com

Friday, September 16, 2016

Doing more Double Exposure (part 2)

Here's another example of a Double exposure effect. I've blended two images to get this:

The basic is to cut out your model and add the second image into the selection.

Here's a clip on how to do it: 


Don't forget to follow us on Facebook or 500px

And have you already discovered our Facebook page Humans of the Nordic Region?

Thursday, September 15, 2016

Double Exposure in Photoshop (part 1)

One of the great effects in Photoshop is the double exposure effect. And believe me: it's really not that hard to create an effect like this:

Basically it's nothing more then combining two pictures plus one layer mask.

In this clip they show you how to do it.

As with most other things: there are more possibilities for doing a double exposure. But it's all based on the two images and a layer mask.

Just try it out!

Don't forget to follow us on Facebook or 500px

And have you already discovered our Facebook page Humans of the Nordic Region?


Thursday, September 8, 2016

How to create a Jigsaw Puzzle Effect in Photoshop

You probably know by now that I love learning about Photoshop from other photographers. What's better than to learn from the experts themselves? There's so many great tutorials out there on the web and I try to select interesting ones to share them with you. 

Today I watched this clip and learned some new things.  

And ofcourse I had to give it a go myself! I find the trickiest part is to use the pentool. More on that in this clip from Phlearn


Here is our puzzle from Amsterdam

Don't forget to follow us on Facebook or 500px

And have you already discovered our Facebook page Humans of the Nordic Region?


picture from Amsterdam by pixabay.com

Monday, September 5, 2016

How to Make Caricature in Photoshop

After a fab summer we've just had a few autumnal days and what better to do than to brush up on your Photoshop skills. 

I really liked this clip from Photoshop Tutorials on editing an image into a caricature. 


And ofcourse I had a go at it myself. I started with this image: 

And transformed it into this caricature:


When you follow the steps in the video you learn how to use the liquify filter and how to use the warp tool. I had great fun figuring it all out, I hope you too!

Don't forget to follow us on Facebook or 500px.

And have you already discovered our Facebook page Humans of the Nordic Region?


picture from Pixabay.com

Thursday, September 1, 2016

How to create a logo in Photoshop

Remember when Instagram introduced its new logo? That got me thinking about how to create a logo and apparently it's not that hard!

I watched these 2 tutorials on the creation of the Instagram Logo on YouTube: 

The first one is from Photoshop Training Channel 
The second one is from Howard Pinsky's .  


It's a great way to learn to work with the Rounded Rectangle Tool (U) and gradients.

If you ask me, I found the first clip easier to follow but have a go, see what works best for you. 


Don't forget to follow us on Facebook or 500px.

And have you already discovered our Facebook page Humans of the Nordic Region?