Tuesday, August 30, 2016

How to create your own cloud/smoke brush in Photoshop

In this blogpost we are going to show you how to create your own brush, using a picture with some clouds.

So this is how you do it: 
Open the image with the clouds. Select the cloud you want to use, using the Lasso tool (L)

Create a new document (Cmd N) 

Go back to the selection of the cloud and move or copy it into the new document

Now we are going to use the channels to extract the clouds from the background. If you don't see your channels go to Window > Channels.

Next: make a solid black colour layer underneath the clouds layer

Now find the channel that has the most contrast between the white and the background. Select this channel and drag it to the Make a new Channel icon.

Then go to Image adjustments levels.
Move the left slider to the right to remove the bright colour around the clouds

Then select the clouds: cmd and click on the channel thumbail to select the colours

Create a new layer and fill it with black 

With the selection still active go to Image > Crop.
Then go to Edit > Define brush preset and give your new preset a name and hit OK

Now we have got a brush and the great thing is: you can modify it. Hit the brush tool (B). 

Photoshop now opens the brush you just created. Click on the icon 

This is where you can change your brush exactly the way you like. 

Me, I started with the Size and Angle jigger under Shape Dynamics

Then I changed the Scatter under Scattering and the Opacity under Transfer. 

When done with adjusting your brush, you can then obviously use it on (all) your pictures. Always paint on a new layer and colourize the clouds with a Hue/Saturation Adjustment Layer (using a clipping mask). By reducing the opacity of the layer you can make the clouds a bit more subtle.

So, after having read all the theory, here's our before and after:  

Before:

After:


Don't forget to follow us on Facebook or 500px


And have you already discovered our Facebook page Humans of the Nordic Region?
    picture from Pixabay.com

Friday, August 26, 2016

How to go Black and white in Photoshop using the Channel Mixer

There are so many ways to convert an image to Black and White. In this blog we describe how to do it in Photoshop.

Even within Photoshop you have several options: There are some options
  • Convert to grey scale
  • Desaturate
  • Black and White Adjustment Layer
What I like to talk about here is using the Channel Mixer for converting your image to Black and White. 

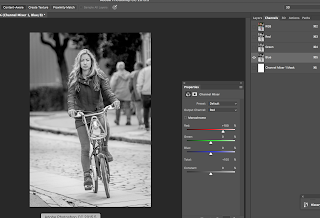
Let's start with this image: 

Now I'll add the Channel Mixer Adjustment layer

And then check out the channels. Click on a channel.
 
The brighter it is, the more colour you'll have in the choosen channel (colour)

Click on the Monochrome checkbox to convert your image to black and white

Now play around with the sliders to get a well-balanced Black and White image.


Don't forget to follow us on Facebook or 500px.

And have you already discovered our Facebook page Humans of the Nordic Region?


Wednesday, August 24, 2016

How to combine photos in Photoshop with Layer Masks

When you know the basics of Photoshop it's very easy to blend pictures together using layer masks.

Check out this vid for an explanation:

I started with these two images:


And combined them into this picture: 

You can achieve this result by dragging the pictures over eachother and using a Layer mask. After you've dragged one image over the other, paint with an opposite colour to make things visible or invisible.

When you paint on a maks always rember the following rule

White revealsblack conceals


Have a go! I found this technique to help me in improving my masking skills.  


Don't forget to follow us on Facebook or 500px.  

And have you already discovered our Facebookpage Humans of the Nordic Region?


Pictures from pixabay.com


Thursday, August 18, 2016

How to create a Photo Collage Template in Photoshop

I discovered this great tutorial made by Helen Bradley on how to make a colllage in Photoshop and how to save it as a template.

Believe me, it's an easy project and very well explained.


This clip shows you things like working with groups and some blending options.

Before you watch and try it yourself, find a background image and an image you want to transform into a collage. We started with this: 


And here's the result: 

Check out this video if you want to find out more.


Don't forget to follow us on Facebook or 500px

And have you already discovered our Facebook page Humans of the Nordic Region?
    pictures from pixabay.com

Thursday, August 11, 2016

How to use the pen tool

One of the things I often do in Photoshop is making selections.  

There are so many way to make selections in Photoshop. But the most accurate one is done by using the pen tool. It looks very difficult but with some practice believe me it's not that hard. This clip by the Phlearn guys is great and shows you how to use the pen tool.


Don't forget to follow us on Facebook or 500px


And have you already discovered our Facebook page Humans of the Nordic Region?


Wednesday, August 3, 2016

How to get a Half Sketch Effect

I'll never stop being amazed at how many great educational vids there are on Youtube. There's so many great videos about a lot of different photoshop techniques! 

Just the other day I watched this clip from Photoshop tutorials.


It creates a half sketch effect and you learn things like masks, creating clipping masks, blending moded and how to install new brushes.

It's a great (and easy) tutorial! Don't be afraid to give it a go. 

This is what I made of it: here's the start situation.

And this is my end result. 

Don't forget to follow us on Facebook or 500px.

And have you already discovered our Facebook page Humans of the Nordic Region?


picture from Pixabay.com