One of the cool new features in Lightroom CC is that you can now create
a panorama without having to use Photoshop.
In previous versions of Lightroom you had to edit a picture in Lightroom and sync the rest of your pictures before you could export them to Photoshop to create a panorama. After saving it in Photoshop, you got it back as TIF file in Lightroom.
But now you can create the panorama in Lightroom CC itself! And the best news is that you'll get it in RAW.
So, how does it work.
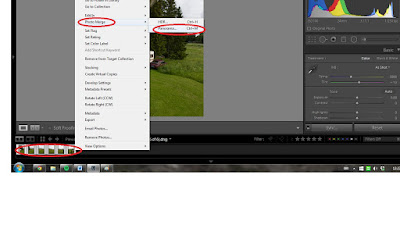
Start with importing your pictures in Lightroom CC. Then select all the pictures that you need for the panorama and Right Mouse click -> select Photomerge > Panorama (shortcut: CTRL+M) or in the Photo menu.


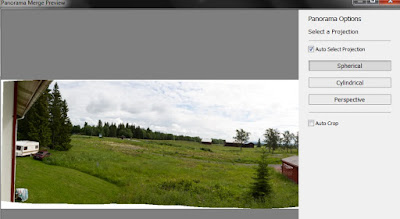
Lightroom CC now gives you a preview with several options

This is the moment to start your usual editing. Normally I do contrast, blacks and whites, Shadows and Highlight, Vibrance and Clarity, Remove Chromatic Abberation and Enable profile corrections, Sharpness and Luminance.Check out the before and after pictures after a bit of simple editing. (backslash (\) in Lightroom)
Right. A few tips:
1. Find a good location for a panorama.
2. Shoot in Manual, so all your pictures have the
same settings.
3. Shoot in portrait mode. Have enough space under and above your main subject.
4. In the ideal situation you should use a Tripod
with a panorama head. But you can do it handheld. To be on the safe side, be sure to be extra generous
with your overlap allowance, 30% every time is a good starting point.
5. Avoid moving objects in your frame.


No comments:
Post a Comment